Sewing Buttons On By Hand - Supplies You Will Need
Sewing buttons on by hand is really a very easy task. You won't need any fancy tools or supplies - you probably have everything you need already. It's just a matter of gathering it all and following a few simple steps!
TIP: Once you do gather your supplies, make up a little "Everything I Need For Sewing Buttons" kit. That way, it will be much easier to locate everything quickly when you go to sew on a button next time.
What You Will Need For The Job
A Button
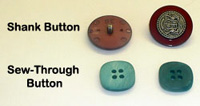
There's two types of buttons available:

Sew-Through Buttons
These are usually flat and have two or four holes. You will see the thread when sewn on. Their purpose may be decorative in which case they are sewn directly against the fabric. If you are going to use a Sew-Through button to actually "button" something, you will need to create a thread shank when sewing on your button. This allows for the thickness of the fabrics around the buttonhole. I will talk about this further on my Simple Steps To Sewing Buttons page.

Shank Buttons
These buttons already have their own shanks attached. Use these buttons for heavier fabrics or with loop closures.

If you have the missing button - great! If not, check inside your garment to see if the manufacturer included any extra buttons. These are often found along the side seam or lower front.
If no replacement buttons are available, you will have to buy some. Remember to take along your item to the fabric store to match the button color and size. You could even try your potential button out in a buttonhole to see how it looks.
Let's say you lost a button on your shirt. Rather than replacing every button on your shirt perhaps you could replace only those along the front with buttons as close a match to those on the cuffs as possible. They don't necessarily have to be an exact match when they are not located that close to one other.
Another creative alternative is to use a different button (but of a similar size and weight) for each buttonhole. If you have a big stash of odd buttons like I do this might be a fun idea to try!
A Needle
Any needle will do as long as it will fit through the button and you can see to thread it!
Thread
Pick a color that matches thread used on the other buttons or match to the color of your fabric.
Pick a thicker thread like a button thread or double up your regular sewing thread.
Scissors
Use to trim thread.
Beeswax
Although not absolutely necessary, if you have some, using it will strengthen your thread.

Toothpick
This is handy to create a spacer for making the thread shank. You could also use another needle or even a straight pin. Choose according to how thick the fabric is at the point where the button will be passing through the buttonhole. This will determine how high your button will need to be raised by the shank.
Related Articles
Go to CreativeSewingTips.com Home Page


